
Some or all of the following selections may be available, depending on the Point of Sale (POS) configuration created for your property.
Depending on your own system configurations and your user access, the Point of Sale (POS) Restaurant Log in page may be the first page that you see when bringing up Skyware Systems. If it is, skip to step 3. If not, you will need to access it:
1. After logging in to Skyware Systems, from the quick menu on the left select Point of Sale (POS).
Note: The exact arrangement of the options in your quick menu may differ from this example.
This will take you to the main Point of Sale (POS) Menu screen.
2. Select the Create/Open Check command by clicking on it.

This will take you to the Point of Sale (POS) Restaurant Log in page.

3. Enter your Server ID.
Type the User number into the Server Quick ID log in field to make the rest of the screen live.
This can be done using the keyboard, or by using the keypad on the screen.
You cannot create a check or view open checks for your tables in the restaurant start page without a server ID number. This page has several areas that only become live after log in. If changes are attempted without user ID being entered the screen will revert back to the original with the red banner A Quick ID is required!
The options for service are across the top tool bar and the contents are dependent on property.

4. Meal or beverage period: If your system has meal periods, this selection determines what menu items are available. Click the button to be given a drop-down menu of the options available to you. In this example these include meal option times such as breakfast, lunch and dinner.
Note: If the option you desire is not available, it may need to be configured, seeConfigure Meal Periods for POS Configure Meal Periods for POS .

Select the option by clicking on it. This will turn the selection's button blue, the chosen option will now be displayed in the top bar button, and you will automatically be moved to the next option.
5. Location of service: if your property has multiple restaurants configured, you will need to choose between them. A drop-down menu of the options available to you will be displayed.
Note: If the option you desire is not available, it may need to be configured, see Configure Outlets for Point of Sale (POS).
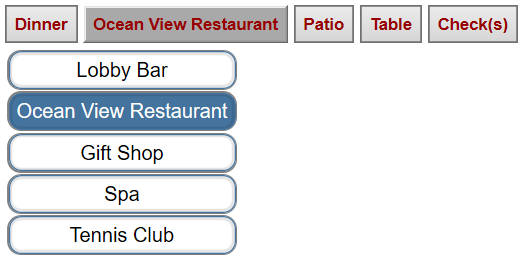
Again, Select the option desired by clicking on it. This will turn the selection's button blue, the chosen option will now be displayed in the top bar button, and you will automatically be moved to the next option.
6. Section of service: This is the area of the restaurant where the customers' table is located. Selecting a section limits which tables are listed. A drop-down menu of the options available to you will be displayed. This list will be dependent on the option chosen in 5. In this example these include patio, booth, or table.
Note: If the option you desire is not available, it may need to be configured, see Configure Table Section for POS

Again, Select the option desired by clicking on it. This will turn the selection's button blue, the chosen option will now be displayed in the top bar button, and you will automatically be moved to the next option.
7. Service layout: A map of the options available to you will be displayed. This map will be dependent on the option chosen in 6. In this example the map of available tables on the patio are displayed.
Note: If the option you desire is not available, it may need to be configured, see Configure Tables for Point of Sale (POS).

Again, Select the option desired by clicking on it. This will turn the table selection button from green to blue, indicating it is no longer available to other staff.

Note: If a table is displayed as red rather than green (available) or blue (yours), this table is being served by someone else and is not available to open a check at.

Blue indicates "Your Table" and for which there is one or more open checks with your Server ID.
Green indicates an "Open Table", or one for which there is not currently an open check.
Red indicate a table that is "Not Yours" and for which there is an open check for a different server.
8. Check(s) open. Any already open checks will be listed in the respective color under this button.
9. ALTERNATELY, if you are working a counter sale or bar or other type of service and you do not need to select a table, restaurant or meal period, you can open a check using the Quick Sale button command, skipping steps 4-8 altogether.

With the Quick Sale button being available for a one-off sale that does not require an open check.
10. After the table is selected, or the Quick Sale button clicked, the screen changes to show the Restaurant Check screen, allowing you to enter the specific information and customer order information for the check. See Restaurant Check screen for more details.
Note: You can also reach the Quick Sale restaurant check screen from the Point of Sale (POS) Main menu screen.

See also Create a Quick Sale Check.
You can also quick add a check to a current table in the restaurant check page. See the Checks section in Modify an Open Restaurant Check.
NOTE: The options available in thePoint of Sale (POS) Check interface are determined by how the POS system is configured, and the options created for the system.
If you are having trouble finding the items you need or configuring customer orders easily, contact your manager and/or system administrator. They may be able to adjust the POS configuration to provide more appropriate options. See Point of Sale (POS) Configuration Menu Overview for more details.
Date Updated October 29, 2025